When a Teacher Leaves

An early bulk of this blog detailed my life as a competitive and showcase ballroom dancer while living with Type 1 diabetes. Then life happened and I’m more or less a recovering addict of dancesport. I participated in showcases post-birth, but I’ve recently changed dance goal directives, putting a stop to solo showcases at the moment. This most recent hiatus is simply because I don’t have a full-time male instructor at this time.

The missing instructor wasn’t a surprise; all students had about a year of notice to plan for next steps and new instructors if needed. This was a vast improvement over what happened with a previous instructor, who turned in his two-week notice to his studio and students and promptly left the country. Being without another male teacher is not new for me, and “retiring” from competitive dancing coordinated nicely with this recent departure, but it’s probably a shock to the core for other dancers who don’t see departures coming.

So, what to do?


Errr… probably not.


Check with the studio’s plan. This kind of depends on how your home studio functions. There are dance studios that operate strictly as space, which then contracts instructors to use said space, or there are studios which hire instructors as employees. Getting and keeping male instructors around seems to be a universal problem in the dancesport community. There seems to be this weird issue of not having enough male instructors at a given studio. But if one does come around, it can be a challenge to establish a student base with an already ingrained community. There is a possibility that there are no immediate plans to hire a high-level instructor to replace the previous one. Maybe there aren’t any available. Studio HR dynamics are a separate post altogether; the goal of this post was to offer suggestions for students who may find themselves orphaned already.

Try the newer/different male instructor. This seems like the easiest solution, though it may seem daunting if you were with an old instructor for a number of years. New teaching methods, new communication preferences, new feelings. It’s going to feel like starting from scratch for a couple weeks/months. It might suck at first, especially if your expectations were molded by your old instructor’s habits. But, it doesn’t hurt to try. A different thought – the new instructor needs to build up his business and experience with students too.

Work with female instructors. They all have to know how to lead, so don’t worry about not being able to work on following. Plus, they can help with styling, connection, turn technique, and footwork variation ideas. (Just a few suggestions.)

Find an amateur/practice partner. Is there a similar-level male student at your studio with similar dance goals? Start practicing together. Share lessons together. (This is a great cost saver too.) Amateur competitions are loads cheaper than pro-am comps if competing is a common goal.

Practice on your own. Your previous instructor probably gave you lots of instruction during your time together. Now would be a good time to work on everything you were harped on during lessons; none of which probably need a partner present. This is a great post on solo practicing.

Form/Join a Small Group Ensemble. I still love performing, so I have been using my previous solo instruction time to work with an all-girls performance team. Still get to work on dance, have fun, and participate in showcases.

Learn the opposite role. Nothing tunes me into my connection with my partners than dancing as a leader. I can only really lead one or two dances, but I’m definitely available to lead socially when the is a leader shortage at dance outings. This option allows the freedom to work with any instructor in the studio for assistance.

Join/Audition for a Competitive Formation Team. This option isn’t always available at studios, but if it is – look into it. For ours, we get weekly coaching lessons by a master level teacher for a low monthly membership fee. Then we perform or compete around the region. The team does amazing things for dancing – plus all of the practice requirements fill out schedules nicely.

Try a new discipline. Was Standard your go-to dance realm? Try Latin. Or American Smooth. Or west coast swing. Not only will the challenge of switching to a new set of dances keep you on your toes, it’ll help your preferred dance. Or you might fall in love with the new dance and never look back.

Leave your studio and seek instruction elsewhere. This is obviously not my preferred suggestion, but if you want to keep dancing, you gotta do what you gotta do. This option is easier to do in larger metropolitan areas, but I can understand why someone wouldn’t want to leave a home-base studio. (I don’t want to leave mine.) But, if your goals don’t match what the current staff can help you with, then that’s a studio problem – not yours. A less abrupt suggestion? See if the pro can come to you every other weekend or so. (Or vice versa.)

How to continue your ballroom dance training when there isn't a pro around.

Start Over

For the first time in a while, I actually feel compelled to write again.

I recently saw an ad for 2017’s Diabetes Blog Week dates. Then got a bit depressed that the prompts were not ready. (I know they won’t be for a while, but given how long it takes to write posts over here…)

I have several ideas to tie up loose ends I started last year – just need to sit down and write.

Until then…

Happy New Year

<blows dust off blog>
<coughgagcoughhack>

If I’m blogging, it must be a slow work day. So, you can understand why I haven’t blogged in a while, right? I mean, I could resolve to blog more for the new year, but resolutions are usually broken by mid-February and I don’t like the sound of that.

There is quite a bit going on, all-inclusive, featuring my health and the health of others, dance, my closet (ha!), my family, and spending habits. I spent the last half of 2016 rather lost and I didn’t want to write meandering diatribes here while I figured my way around them. Some might say I’m still lost, but I’m enjoying the scenery a bit more.

I took the mantra, “only write when you feel inspired” a bit too seriously. I had blips of ideas for blog posts during that time, but never got around to writing them. Also, joining a competitive dance team eats up whatever spare time I may have left after my day is done.

I’ve been following the D-community on Twitter to keep a faint pulse on what is happening in that part of my world, but I’m not as in tune as I once was. There is quite a bit going on, so me keeping a faint pulse on the news is more like sitting in a soundproofed room with a rock concert occurring next door – you can still hear the bassline. My main interests have been (now definite) healthcare dismantling reform and insulin/supply costs. So, see… rock concert.


Like most people do, I set up some goals to accomplish during this year. As I was finishing up listening to this week’s edition of Pantsuit Politics, the hostesses closed out the show by sharing their assigned Word of the Year. One hostess has chosen one word to define the entire year ahead of them and then makes goals or lives her life with a focus on that word. For example, one year’s word was “Simplicity” and the goal was to cut out unnecessary items from life. Given my list of goals for 2017, I’ve decided to chose a word myself: “Sustainability.”

The word sustainability automatically triggers a lot of “green” and “eco-friendly” practices and memes for people. This was part of the reason I picked it, but I’m not in the mindset to fall off The Grid and live off the earth alone. (I wouldn’t survive long.) But, can I change things in my life that will sustain my dance hobby – like stretching regularly and becoming more flexible? Can I sustain my income by not shopping as often or dropping stupid purchases? Can I sustain my health by drinking more water, finding a new endocrinologist who I actually like,  and reaching out more to others with my health condition? Can I sustain my relationships by dropping a line to an old friend or having more date nights with my spouse? And yeah – moving toward a less “plastic-dependent” lifestyle and whatnot.

So my plan for this blog is to try and document my year with this word, which, I know, is a bit different than the original premise of being a “d-blog of a dancer.” But, I still hope you find this spot on the internet entertaining and worth reading, even if I’m not dancing as much.

Disney with T1D – Food, Beverage, and SWAG Boluses

Disneyland with Type 1 Diabetes - SeeJenDance

About three years ago, I wrote a very similar post about navigating the Disney Resort with a broken pancreas. However, times have changed, information was left out, and the post was extremely long. To follow up on this original post, I’m creating shorter series-like posts to reference at different points of trip planning.

Why is this relevant to the non-Disney fan? The Friends for Life Conference is held annually in Orlando, usually on or near Disney property. CWD is also planning a conference at the Disneyland Hotel in September 2016 and  May 2017. (And if you are a parent caring for a CWD, definitely check out a Friends for Life conference if you can.) In between sessions and in the evenings would be a fantastic time to check out the Resort.

These posts are Disneyland Resort, California specific, but the tips can apply to visiting the Resort in Orlando as well. (I just live much closer to “Land.”)

Previous Posts: Where to Stay, Packing List Part 1 and Part 2, Traveling Tips, Navigating the Parks, Disability Access Cards.


I have a love/hate relationship with the food at Disney Parks. Food costs aside, this is probably one of the most frustrating aspects of planning a Disney vacation. But, there are ways to enjoy the culinary offerings in the Resort without blowing through a vial of insulin. Here are things to be aware of, plus helpful alternatives.

Disney with T1D - Food, Beverage, and SWAG Boluses

First, what’s a SWAG Bolus? “Scientific Wild Ass Guessing.” A term of endearment I’ve picked up from the DOC, which essentially means carb counting is futile and I just need some form of insulin on board. Correct later.

This is usually how I get by in the Parks because Disney, as accommodating as they try to be to special diets, does not provide Nutrition Information, including carb counts, for their restaurants. Anywhere.

post-33868-merida-oh-no-gif-why-disney-pr-mug4-1

Whhhhhyyyy are there no carb counts???

This makes it sound like eating at Disneyland is a crapshoot, right? Kind of. In Disneyland, bread is still technically bread, garden salads are still lettuce and other veggies, a cup of fruit is just that. The Mouse does not inject extra carbs in places normally not found just to mess with us. (How’s that for a visual?)

There are two strategies to take: a) Don’t worry about it too much and the excess of carbs and treats will be balanced out by the amount of walking done (because it’s a vacation) or b) go back to basics on learning about estimated portions and be as close to the perceived normal as possible. Keep in mind that this is still a vacation with various routine changes to consider – so the best efforts could still be thwarted. (Sometimes roller coaster BGs just happen.)

There are a few blogs and websites out there to help. Since eating low-carb and gluten-free have become almost diet staples these days, these types of accommodations are readily available.

Here are a few pages I stumbled upon: Eating Low Carb in Disneyworld | Portion Control with Hands | All Ears.Net Type 1 with D (older) | MyFitnessPal (lots of sweets) | Gluten Free Options in DL

Some general advice:

  • Try not to stress about wild sugar control while here. Obviously, be vigilant about treating lows when they pop up, but it’s easy to let the meal planning overtake the reason we are here – a vacation.
  • Bring in your own meals/food. Pack sandwiches which have been pre-carb counted. Or…
  • Eat outside of the Parks. While the Disney food is novelty, there are a ton of chain restaurants (with nutrition information available) on South Harbor and Katella. Escape and go eat… probably for cheaper. Especially if the crowds are insane.
  • Seek out items you know. Like chicken caesar salads. Or a grilled cheese sandwich. Vegetable Soup. A Turkey leg. There are plenty of recognizable food items available in the Resort that don’t require strange math equations. 
  • Indulge in a treat here and there. I’ll cover a few “bolus-worthy items” below. Things like this keep me sane and remind me that I’m on vacation, even if I’m working hard trying to keep my health in line.
  • Split/Share meals. Works great with a toddler in tow. I usually finish Bean’s vegetables and take a few bites of her mac n cheese. Then order an entree salad. I’ve also shared with my spouse. Unless ordering specific items from counter service, meals are large enough to feed two.
  • Check menus beforehand. Menus for all restaurants in the Resort can be found online with a simple Google Search. Here is one example.

Some Resort Favorites for Dining as a PWD

  1. Carnation Cafe (Disneyland) – great comfort food selections, but they also have salads. Breakfast and lunch are great. Make reservations around Parade Time.
  2. Jolly Holiday Cafe (Disneyland) – The Grilled Cheese and Tomato Soup combo is my go-to, but they also have salads and other low carb options. (Chicken salad for example.)
  3. Storytellers Cafe (Grand Californian) – They have a great breakfast buffet with several lesser known characters walking around. But, the nice thing about buffets is that I can pick out specifically what I want how much of it. So pile on the eggs and bacon or grab a mini Mickey waffle. Breakfast goers can also show their receipt at the Grand’s California Adventure gate and get early access.
  4. Bengal BBQ (Disneyland) – everything is on a stick! Lots of lower carb & protein-friendly options here. Plus, it’s counter service, so it’s quick and usually not crowded.
  5. Hungry Bear Restaurant (Disneyland) – Salads, wraps, and sandwiches. It has weird hours, so head there for lunch.

*You may notice that there aren’t any California Adventure restaurants listed. I’m sure there are options available, but M and I are so rarely in CA to eat meals, that I don’t really have a favorite. We mostly just get snacks, coffee, or alcohol while there.


Finally, Treats in the Resort that are Totally Bolus-Worthy

Disney with T1D - Food, Beverage, and SWAG Boluses

  1. Dole Whip (Disneyland) – Right by the Tiki Room. Pick the line inside the Tiki Room entrance. Much shorter. Also, it’s essentially Pineapple Fro-Yo served in a portion large enough to share. Yum!
  2. Churros (Various) – These carts are everywhere. Follow the smell. But again, split one. One full churro is quite overwhelming.
  3. Potato Soup at Carnation Cafe (Disneyland) – One of my favorites. It’s a fully loaded, creamy bowl of deliciousness. Which stays with me like a slice of pizza. Adjust accordingly.
  4. Mickey Waffles (Anywhere breakfast is served) – As I mentioned, these can be found in smaller sizes at Storytellers, so they don’t have as great of an impact on sugar levels – so long as not all are consumed. Top with sugar free syrup, readily available pretty much everywhere. (Aside – these apparently have a gluten free option.)
  5. Fried Chicken (Plaza Inn/Disneyland) – Fried chicken is tricky because it’s high protein vs. fried, carby exterior. But this stuff melts in your mouth and satisfies even the pickiest of toddlers.
  6. Gingerbread Beignets (or regular ones work too) – Can really only be found around Holiday time, but they come in a set of three, so easy to share.
  7. Bread Bowls at Pacific Wharf Cafe (CA Adventure) – Being a California native, I know how good Boudin bread is. I encourage others to explore the fabulousness of it – just maybe don’t eat the whole bread bowl.
  8. Mickey shaped, well, anything. ‘Nuff said.
Disney with T1D - Food, Beverage, and SWAG Boluses

Om nom nom.

So, hungry yet? Did I miss anything? Tell me below in the comments. Enjoy exploring the different culinary options available in the Resort.

This is also the last installation of the Disneyland with T1D Series. Hope to have helped with planning this great trip. Be sure to check out the Friends For Life Conferences either in Anaheim or Florida if the travel dates align.

Disney with T1D – A Word About Disability Access Service Cards

Disneyland with Type 1 Diabetes - SeeJenDance

About three years ago, I wrote a very similar post about navigating the Disney Resort with a broken pancreas. However, times have changed, information was left out, and the post was extremely long. To follow up on this original post, I’m creating shorter series-like posts to reference at different points of trip planning.

Why is this relevant to the non-Disney fan? The Friends for Life Conference is held annually in Orlando, usually on or near Disney property. CWD is also planning a conference at the Disneyland Hotel in September 2016 and  May 2017. (And if you are a parent caring for a CWD, definitely check out a Friends for Life conference if you can.) In between sessions and in the evenings would be a fantastic time to check out the Resort.

These posts are Disneyland Resort, California specific, but the tips can apply to visiting the Resort in Orlando as well. (I just live much closer to “Land.”)

Previous Posts: Where to Stay, Packing List Part 1 and Part 2, Traveling Tips, Navigating the Parks.


One Disney Park item I haven’t really explored in great detail is the Disability Access Service program. The major reason for not doing so? Well, honestly, why would I need this – I don’t have any special needs that would require this amenity in the Parks.

I’ve been on enough Disney vacations where my condition has never been a hindrance (*knocks wood*). I have had moments, interruptions, and inconveniences of course. But I am lucky enough to not have diabetes completely mess with plans.

Consider the Disability Access Service Card to be a safety net for an already well thought out plan.

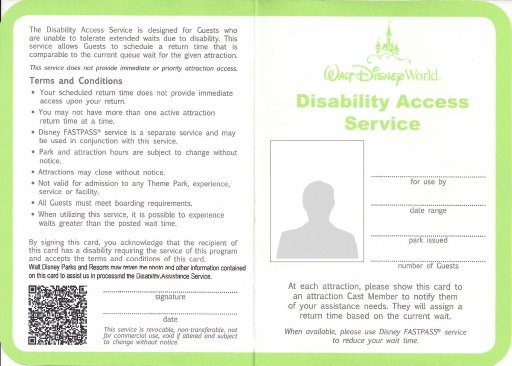
2013-10-25-dascardcopy

Sample card (from WDW) from the internet. Disneyland Resort logo would be different, obviously.

Some background: In an effort to make the Parks enjoyable for everyone, the DAS cards are available at Guest Services, providing equal access to the amenities, programs, and attractions as needed. Those with mobility, auditory, vision, or cognitive disabilities are frequently used as examples in blogs, news articles and other forms of media to describe this program. The recently revised program involves a short interview with Guest Services and a photo of the individual requesting the card. Disney is not able to ask guests to provide proof of any condition or illness during the interview; only ask what are the requirements the guest needs to make the experience more enjoyable. For example, a child with autism may need a quiet place to stand in line and the ability to leave a line and return at another time.

The card then serves as a Fast Pass-like feature, allowing the guest to not spend time sitting in one queue for long periods of time in a crowded place. Instead, a return time is given at various guest service stations, or the ride itself, and the card holder and family members will ride during their specific time. Click here for a whole lot of information about the program.

This revision apparently serves as a fraud deterrent because the previous program allowed guests to “jump to the front of the line” or ride a ride multiple times without getting off. 

Since I have nothing to compare it to, I have no idea if the previous program was better than the current. But, I fully support keeping a program honest and a Fast Pass-like system isn’t a terrible idea. There are a few blogs available via Google Searches, as well as Disney Forums detailing stories of experiences with the new (and old) system.

So why would this benefit people with diabetes at all? I know, for one, I feel guilty using these systems because “I don’t look sick.” I have an invisible illness so I should be able to enjoy these Parks just as my husband would, right?

But then I thought of a few examples:

enhanced-19372-1429049188-29

Borrowed from the internet. Example of a readmission pass.

  1. Queues in the heat. I have talked about how keeping hydrated is very important in the Parks. And while Anaheim doesn’t get extremely hot most of the year, summer season can be surprising. In recent months, Anaheim has topped out around 100 degrees; not fun. Even the best efforts to keep hydrated can be thwarted by a hot day. And if I’m stuck in Peter Pan’s queue in the afternoon, where the average wait is 40 minutes on a good day, I can kiss goodbye to my insulin’s effectiveness. Instead, I could use the pass to “wait” in the shade somewhere, then approach the exit with my party and ride as normal.
  2. Hypoglycemia in lines. Lows can strike at the most inconvenient times. Nothing like having to chomp down on glucose tablets while in line and then feeling the hangover around a ton of people while remaining upright. The DAS cards grants users, and their guests, readmission rights. Or a little sheet of paper that states, “hey, return between these times and jump back in the FastPass line when ready.”
  3. Frequent bathroom trips. Similar to point two –  if blood sugars are running higher than normal, most likely, so is the frequency to use the restroom. The readmission cards will also be helpful in these instances since bathrooms are never near the queues.
  4. Access to quiet spaces. I personally like time to decompress after a bad low. But I’m far from the age of being able to sit in the Baby Care Center without a child. (Though, a child with diabetes probably can.) Guest Services should be able to provide a guest with this information and point out any special areas to retreat if I just need a moment.
  5. Access to clean spaces to do site changes. Surely, a crowded restroom with a zillion screaming kids and no counter space is not an ideal place to change an infusion set. Ask Guest Services about Family Restrooms or other suggestions to do this while in the Parks.
  6. Special diets. The Resort restaurants are ready to accommodate a litany of special diets, including dairy free, vegetarianism, gluten free, and no refined sugar. These requests can be made without a DAS card, of course. But for more complicated requirements, allergies, or diets, include this in the conversation with guest services. I will talk about food and beverage in a later post.

These are just a few suggestions of how diabetes can be accommodated with the DAS program. From what I’ve gathered, the interview is more of a “how can we accommodate you best” questionnaire, rather than an interrogation to ensure people aren’t cheating the system. But, in this one instance, diabetes can serve as an advantage to organizing a trip.

I plan to explore this program a bit more when I visit in November. Has anyone used the DAS cards as a T1? Share your experience below.

Disney with T1D – Navigating the Parks

Disneyland with Type 1 Diabetes - SeeJenDance

About three years ago, I wrote a very similar post about navigating the Disney Resort with a broken pancreas. However, times have changed, information was left out, and the post was extremely long. To follow up on this original post, I’m creating shorter series-like posts to reference at different points of trip planning.

Why is this relevant to the non-Disney fan? The Friends for Life Conference is held annually in Orlando, usually on or near Disney property. CWD is also planning a conference at the Disneyland Hotel in September 2016 and  May 2017. (And if you are a parent caring for a CWD, definitely check out a Friends for Life conference if you can.) In between sessions and in the evenings would be a fantastic time to check out the Resort.

These posts are Disneyland Resort, California specific, but the tips can apply to visiting the Resort in Orlando as well. (I just live much closer to “Land.”)

Previous Posts: Where to Stay – Ultimate Packing List Part 1 and Part 2Traveling Tips


After all of the planning, suitcase triple checking, and traveling, we’ve made it to the Resort. Hooray!

Disney with T1D - Navigating the Parks - SeeJenDance

There are a few blogs available out on Pinterest which offer road maps to the Parks, with a suggested order of rides, Fast Pass collection, and helpful hints to plan the day. This won’t cover any of that. (That’s why those blogs exist.)

Here are the more pertinent details for a PWD in Disneyland.

For reference, let’s look at the maps of each Park. 

  1. First and foremost, figure out where all of the bathrooms are. Bathrooms, though not the cleanest, are usually where families will test blood sugars, administer insulin, change sites, etc. Also, if it’s a particularly high day, bathrooms will be visited frequently. Locate them early.
  2. Visit Guest Services upon arrival. Here, a guest disability access services card can be obtained if preferred. More on that in a later post. I personally have never used one before, but it could help PWDs enjoy the Parks a bit more.
  3. Locate the First Aid Station and the Baby Care Center. (Usually located next to each other.) The Disneyland First Aid Station and Baby Care facility are located at the end of  Main Street, near the Little Red Wagon corn dog truck. California Adventure’s Baby Care Center is in Pacific Wharf, while the First Aid stand is near the front entrance. I loved having access to the Baby Care station with Bean because it was a nice, quiet air conditioned location to feed or change diapers. These centers can also help with young CWDs who need a quiet place to rest after a bad hypoglycemic reaction. (Pro tip – the nursing rooms in the CA Adventure Baby Care center are private and have rocking chairs.)

Some general tips:

  1. Adjust basal and bolus output as necessary. Sometimes the bright colors and loud music can make me forget I’m walking extremely long distances over a 10 hour period. Especially with long queues. I tend to run a lot lower than normal because of the increased, but steady, activity. While there are many treats available at the ready, a churro every hour to correct dropping blood sugars probably isn’t cost effective. Or efficient.
  2. Take breaks. There are plenty of benches, tables near street shows, and the Enchanted Tiki Room available to sit down and recollect. Or eat something more sustainable. Or rehydrate. Speaking of…
  3. Stay hydrated! While SoCal maintains a fairly consistent whether pattern (always sunny!), there are days, especially now during the summer, where temperatures can hit the upper 90s to low 100s. Sans the obvious heat stroke risk, high blood sugars love dehydration.
  4. Check blood sugars often. I rely a lot on my Dexcom, but I didn’t always have one. On an average Disneyland trip, I can check about 10 times during waking hours. Helps catch hypos I’m not feeling right away.
  5. Bring in food from home. Disney doesn’t have a restriction on bringing in outside food, especially if there are dietary concerns. This option not only saves money, but there isn’t any second guessing (usually) about portion sizes and carb counting. So go ahead, bring a sandwich and grab a table at the counter service locations.
  6. Rent a locker. If space allows, bring a small cooler. Rent a locker at the front gates for the day and pack spare insulin, or spare juice boxes, with ice packs. This is one thing I don’t recommend carrying around the Parks because it either needs to stay on me the entire time, or it becomes a theft risk if I leave it with our stroller. Keep in mind that the lockers aren’t temperature controlled by any means, but this is probably a better place than say, a hot car.

Disney with T1D - Navigating the Parks - SeeJenDance

I’ll speak more about the guest disability access card next. From what I’ve read about the program, it may or may not be useful to PWDs. But since it’s available to us, it’s worth checking out.

Disney with T1 – Traveling: From The TSA to the Grapevine

Disneyland with Type 1 Diabetes - SeeJenDance

About three years ago, I wrote a very similar post about navigating the Disney Resort with a broken pancreas. However, times have changed, information was left out, and the post was extremely long. To follow up on this original post, I’m creating shorter series-like posts to reference at different points of trip planning.

Why is this relevant to the non-Disney fan? The Friends for Life Conference is held annually in Orlando, usually on or near Disney property. CWD is also planning a conference at the Disneyland Hotel in September 2016 and  May 2017. (And if you are a parent caring for a CWD, definitely check out a Friends for Life conference if you can.) In between sessions and in the evenings would be a fantastic time to check out the Resort.

These posts are Disneyland Resort, California specific, but the tips can apply to visiting the Resort in Orlando as well. (I just live much closer to “Land.”)

Previous Post: Where to Stay
Previous Post: The Ultimate Packing List, Part 1 and Part 2


The bags are packed. The hotel is booked. Let’s go to Disneyland. Oh wait, how? And what about all of this diabetes stuff? While this is a Disney-centric series, the travel tips below are pretty general.

Coming from Northern California, I have both road tripped and flown to Orange County. I find flying to be a bit easier, but realize large families can’t always pile onto an airplane without a significant budget line item. I’ll explore both.

Flying

aircraft-1362586_1280

If this isn’t a cost strain, I’d highly recommend this option. An early morning flight on a weekday dumps me in Orange County with more than half of the day left to play in the parks. It’s not always convenient with diabetes, but I consider this to be a small blip in the grand scheme of things.

Pros (for me personally):

  • Less travel time – particularly if very little luggage is checked or if flying at an off peak time. (E.G. weekday mornings are VERY busy and require 2-3 hours before the flight takes off.) Most of the time, things go smoothly.
  • Checking Luggage – my preferred airline, Southwest Airlines, allows up to 2 free checked bags. Great for all of those extras I need to bring. And they have so many sales throughout the year to make the trip more cost effective. They have their faults, of course, but so does every other carrier.

Cons:

  • Based on the most recent Southwest Airlines news, cancelled flights and major delays can happen. (But so can traffic.)
  • Dealing with the TSA and Security “protocol” – There are lots of mixed opinions and anecdotes about how diabetes devices and the TSA do or don’t get along. I, for one, will not send my pump through the X-ray anymore, nor will I send my Dexcom through. My sensor can’t go through the scanners most major airports have now. So I requested opt outs and pat downs. This added a lot of travel time.
    Also, I had TSA agents who were either really familiar with diabetes devices and others who were not. Some just swabbed my hands; another wanted to swab all of my pocketed devices. (My Dexcom receiver actually set off an alarm once and I required three levels of permission to get to my flight.) I often arrived at the airport wondering what I’d be asked on THIS trip. And I’ve read about other travelers who just send all their devices through and they’ve never had a problem.

    • Medtronic and Dexcom both advise NOT to send their devices through X-Ray or Millimeter scanners.
    • TSA doesn’t appear to send children under 12 through the scanners. The metal detectors are usually opened for small children, and their families to pass through. (Check the TSA website for more details.)
    • TSA Pre-Check is a more expensive means of getting through security, but this method allows me to go through a metal detector only with my devices on my person. No more pat downs. Or removing shoes. Or removing liquids, etc.
  • Checking luggage and lost luggage: It can happen. This is why most travelers with diabetes will recommend NOT checking any diabetes supplies and bringing along snacks or meals that fit TSA guidelines. (So, probably no Jell-O packets.)

Tips on Flying with Diabetes

  • If on MDI, carry a copy of the prescription with you. Diabetes is pretty commonplace, so an insulin pen probably shouldn’t be that surprising to find in a purse. If there are full vials of insulin in a carry on, the TSA might question it without a ‘script.
  • Bring snacks and an empty water bottle. Because airport food is expensive, as is bottled water. Fill the water bottle after Security at a restaurant tap. (Might require a food purchase.) Stay hydrated.
  • Prime and clear insulin pump tubing after landing. Sometimes air bubbles can form after being in a pressurized cabin for a long period of time. Air bubbles can cause high blood sugars later.
  • Change all devices to the appropriate time zone upon landing. (Not before.)
  • Walk around the cabin a few times during the flight if it’s particularly long. Or, schedule a flight with a layover and use that time to walk, stretch, keep the blood flowing, etc.

Road Trip

street-238458_1280

Another viable method to Anaheim is the road trip. From Northern California to Anaheim, the trip can take about 6-8 hours, depending on the traffic and time of day. While it’s not my preferred method, it is easier for many people to load up the car and go.

Pros:

  • Cheaper. Considerably if traveling with a family of four, with children over the age of two. Plus, no luggage fees, TSA struggles, and limited food options.
  • Flexible. Want to leave at 3 am in order to catch the Rope Drop at Disneyland? Go right ahead. Everyone else can sleep in the car. Need to take a break at the rest stop? Cool. Take one.
  • Cleaner. (Arguable, if the car is not the cleanest.) But, sharing pressurized air with everyone on an airplane can make me susceptible to colds. Especially since the air is so dry. At least in a car, windows can be opened.

Cons:

  • Two days are lost due to travel time.
  • There will always be traffic in Los Angeles. Sometimes it’s tolerable. Most of the time it’s at a stand still. For hours. Nope. The Grapevine is highly unpredictable.
  • Less flexibility to move around. Unless stopping every hour is okay with everyone.

Tips for traveling by ca

  • Try to keep all diabetes supplies in the car. Not the trunk or somewhere else inaccessible while on the road. Same goes for snacks and hypoglycemic treatments. Site changes will probably require rest stop breaks.
  • If the trip is longer than 4 hours, explore using a temp basal to increase insulin during the car ride. Particularly if basals are set low to accommodate a very active lifestyle. Talk this option over with a doctor first.
  • Get out of the car and stretch as often as possible.
  • Pack meals and water/drinks in a cooler to avoid strange restaurants with questionable carb counts.

Happy Travels! Next, the first day at Disneyland!

Disney with T1 – The Ultimate Packing List, Part 2

Disneyland with Type 1 Diabetes - SeeJenDance

About three years ago, I wrote a very similar post about navigating the Disney Resort with a broken pancreas. However, times have changed, information was left out, and the post was extremely long. To follow up on this original post, I’m creating shorter series-like posts to reference at different points of trip planning.

Why is this relevant to the non-Disney fan? The Friends for Life Conference is held annually in Orlando, usually on or near Disney property. CWD is also planning a conference at the Disneyland Hotel in September 2016 and  May 2017. (And if you are a parent caring for a CWD, definitely check out a Friends for Life conference if you can.) In between sessions and in the evenings would be a fantastic time to check out the Resort.

These posts are Disneyland Resort, California specific, but the tips can apply to visiting the Resort in Orlando as well. (I just live much closer to “Land.”)

Previous post: Where to Stay

Previous post: TUPL, Part 1


This post contains affiliate links.

I promise this list will be a bit shorter than the items to be brought on the vacation itself. Plus, it’s fairly similar to part one; but there is no reason to carry 10 infusion sets inside. (I mean unless you really want to. But, why?)

Let’s assume the hotel or condo of choice is within walking distance. (I.E. Less than a mile from the entrance.) And that everything is being carried in that awesome bag I said to bring in Part 1. There are other lists available on the internet about other items to bring into the Parks (like toys for kids, cash, sunscreen, ponchos, etc.) If traveling with a PWD, add these items to your stash.

  1. Everything needed for a 12 hour period of diabetes. This includes a meter with test strips, a lancing device, a method to administer insulin for meals, a full pump cartridge and functioning battery, a CGM, if used. I feel like this is common sense, but I’ve also accidentally left home without my meter or a vial of fast acting insulin. It happens. Pack it.
    • Aside: try to keep all of these supplies in the same general area of the backpack or purse. Bags are searched upon entry and it’s just easier if stray syringes also accompany the glucose meter. I’ve never had a problem with my supplies being questioned, but who knows.
    • Aside 2: If space allows, pack an extra site change for the insulin pump. Usually, if I have a wayward site, I can leave the Park and walk back to the hotel to change it. But if walking back in 10 minutes isn’t an option, keeping one replacement site on hand is necessary.
  2. Something to wipe down sticky hands. This can be baby wipes, anti-bac wipes or gel, or whatever. There will be times where checking glucose levels need to occur far away from a restroom. Since everything in Disneyland sweats sugar, wiping down before a check will greatly assist in keeping everything accurate.
  3. Snacks and Hypoglycemia treatments. I try to keep several in my bag at the top of the morning and then replenish on a midday break. This is also cheaper than purchasing snacks and big bottles of soda from Disney itself. Glucose gels are handy here because they are quick acting and flat – so they can be layered on top of each other with minimal room.

    • Aside: Disneyland Resorts allows guests to bring in their own food to the parks, so hiding these items at the bottom of a bag isn’t necessary. Bringing in meals is also an option, but I’ll cover that later.
  4. An extra pair of socks. If a midday break isn’t in the plans, pack an extra pair of socks. Water rides are fun, but sitting around in wet socks is not.
  5. Disney with T1D - Packing List part 2 - SeeJenDanceReusable water bottle. Doesn’t matter if one is brought from home or bought at the souvenir stand. High blood sugars thrive on dehydration. Stave off dehydration and purchasing multiple $3-$4 bottles of water by bringing one from home. (I like Klean Kanteens.) The tap water in the Parks is okay (woo, LA Water) – see if the bottle can be filled with ice first or bring some Crystal Light Pure or True Lemon.

Have anything else to suggest? Comment below.

Disney with T1 – The Ultimate Packing List, Part 1

Disneyland with Type 1 Diabetes - SeeJenDance

About three years ago, I wrote a very similar post about navigating the Disney Resort with a broken pancreas. However, times have changed, information was left out, and the post was extremely long. To follow up on this original post, I’m creating shorter series-like posts to reference at different points of trip planning.

Why is this relevant to the non-Disney fan? The Friends for Life Conference is held annually in Orlando, usually on or near Disney property. CWD is also planning a conference at the Disneyland Hotel in September 2016 and  May 2017. (And if you are a parent caring for a CWD, definitely check out a Friends for Life conference if you can.) In between sessions and in the evenings would be a fantastic time to check out the Resort.

These posts are Disneyland Resort, California specific, but the tips can apply to visiting the Resort in Orlando as well. (I just live much closer to “Land.”)

Previous Post: Where to Stay


What Disneyland planning series would be complete without a packing list? (Which can then be Pinned to a random “Travel” board and subsequently forgotten about? Guilty!)

PWD Packing List for Disneyland - SeeJenDance

Look, I even offer a graphic to Pin!

I’ll start by saying that I began 2016 with a Capsule Wardrobe. Pinterest has lots of Pins touting the ease of traveling by having this teeny tiny wardrobe and visiting Europe for three months using only a carry on bag. WOW!

Realistically, I can fit a week’s worth of clothes in a carry on bag. But I probably need another carry on bag for my diabetes supplies alone. So, draw a big fat line through that fantasy. Double strike through if there is a toddler in tow.

tumblr_n66brffd6f1sewiyco1_400

There are plenty of Disney trip packing lists on the internet to view for essentials, like clothing, shoes, first aid supplies, toys, etc. And while I have dabbled in some fashion advice for seasons, that’s not what this list will be for.

For simplicity, imagine the Disneyland trip is for one week, with 3 days in the Parks themselves. Assume that the day-to-day essentials are already packed. (E.G. A meter, an insulin pump, a vial of insulin.)

  1. Baggallini bags

    Baggallini bags are often recommended.

    A bag or purse. Seems obvious, right? I mean, I have to carry my pancreas in my pockets, so that space is full for other essentials, like glucose tablets, my meter, snacks, whatever. Before Bean, I could get through the Parks with one crossbody bag for the day. Now that there is a toddler with us, we have the available space of a backpack/diaper bag. I love things with pockets because the organization is pretty helpful when hypoglycemia strikes. (The glucose is always in the same place.) If it’s a child with diabetes, a small backpack works wonders. (I often wore a fanny pack on family trips. No shame.) The bag should be durable, well made, and something that can get dirty/sit on the ground/thrown on sticky tables, etc. I used a Baggallini cross body bag (similar) on our last trip with Bean.

  2. Two weeks worth of pump supplies, sensors (for pump and CGM users), or syringes (for MDIs). Because while I could only use three sets during a seven-day period, I could have bent cannulas, No Delivery alarms, or just sheer dumb luck. Sometimes throwing a full box of 10 sets in the suitcase is convenient.
  3. Backup supplies. This can be in the form of syringes, an extra vial of insulin, a backup machine, extra batteries. At least enough to either finish the vacation or allow time for a courtesy prescription to be ordered and received.
  4. Glucagon kit. I will admit I’m terrible at toting this thing around. I almost never bring it with me because, while I keep an active prescription around, I haven’t needed one in a long time. (*knocks wood*) That said, it was used a lot when I was newly diagnosed, mostly because as a child, I didn’t understand my hypoglycemic symptoms. So, if packing for a CWD, include the glucagon kit. Better safe than sorry. Non-medical advice: My mom got by with putting glucose and cake frosting gels under my tongue most of the time. YDMV.
  5. Other hypoglycemic treatments. My personal favorites for the park include fruit snacks, glucose tablets (bring the whole bottle), glucose gels (if you can find them). Skittles, Sweet Tarts, Smarties, and Jelly Beans are also portable options that can be stuck in old test strip containers. I also keep juice boxes in my hotel room for overnight lows.
  6. giphySnacks! Disney Park food is expensive and not necessarily the quickest. I keep granola bars (sans chocolate, because it melts) with me because those are small, lightweight, and I can stick several in my bag without them getting smushed. (I avoid cereal bars if I can because they explode.) Bonus if they have some sort of protein in them. Great for chowing down in line or on the way to the Parks themselves.
  7. Ketone sticks. Besides the obvious reason to have on hand (testing for ketones and possible DKA), these are handy for checking if a soda is actually diet.
  8. Doctor’s Contact Information and Medical Information. Most of this stuff should, in theory, be available in cell phone contact lists and the internet. But, in the heat of an emergency? Have this stuff saved in a screenshot in Photos or in a Note. (Or the Android equivalent.) Bring insurance cards.
  9. 123181562

    Put DOWN the Minnie shoes.

    Comfy shoes and SOCKS. I’m all about comfort, especially in the Parks. I’ve racked up anywhere between 6 and 10 miles during one day. Plus, standing in line for long periods of time does a number on my feet. Since feet are a big deal for PWDs, take care of them. Now is not the time to break in those new flip flops. It won’t end well. I’ve shamelessly walked around in Crocs ballet flats or TOMS for a weekend in the parks. 

  10. Medic Alert bracelet. This shouldn’t come as a surprise to bring this, but I’ve only really started wearing a bracelet religiously in the last five years. So, maybe it is. They don’t have to be ugly or clunky. There are plenty of fun ones on Etsy or through Lauren’s Hope. But, in a huge public theme park like this, this is a must have. Make sure it includes the type, a name, a phone number for a parent if it’s a child’s bracelet, and whatever else that can fit. EMTs will look at the wrists and neck first for medical information if someone is unresponsive.

See that wasn’t so overwhelming. (I know, my suitcase is generally full at this point too.) Next, I’ll talk about what to actually bring into the Parks.

genie-packing-suitcase-85287

Do you travel a bunch as a PWD? Do you have any suggestions to add?